Showing posts with label gift cards. Show all posts

Saturday, March 31, 2012

April 2012 Stamp of the Month Blog Hop

Welcome to the April 2012 CTMH Stamp of the Month Blog Hop featuring You Are, a set of 15 Stamps.  Whether you have arrived here from {Angel's} blog or this is just your starting point, just click on the link at the end of each post to enjoy our round-robin hop.

Sticking with last month's theme (working with the extremely limited supplies I have on-hand) and the fact that we are nearing the end of the school year, I thought I'd make a gift card holder.  Whether a gift card for your children's hardworking teachers or for a favorite grad, a handmade gift card holder adds the personalization that may otherwise be lacking.  For this simple holder, I cut a sheet of cardstock 3 inches by 11 inches, and scored it at 4.5 inches and 9 inches.  Crease and fold at the score lines, and then use adhesive on the top and bottom of the short (2 inch) side to create a pocket in which to slide your card.  I stamped the background pattern and trimmed it to make a panel for the front of the gift card holder, then stamped the sentiment in a coordinating color.  At that point, I decided to trim about 1/2 inch from the right edge of the front in order to add a little bit of interest.  I mounted the panel to the card front, and voila!  You can embellish these card holders in many ways, either by adding actual embellishments, ribbons, etc. or by making them in decorative shapes (by using corner cutters, die-cut systems, or digital cutting systems.  The possibilities are limitless!


Papers: CTMH Colonial White cardstock, Scribble Scrabble Sweet & Sour Fruit Medley
Inks: CTMH Desert Sand and Tulip
Stamp Sets: CTMH You Are

Remember, You Are is only available April 1st-30th 2012.  Contact your CTMH consultant, or click here, to get one for yourself.

Now hop on over to {Elizabeth's} blog to see her creation.

If you find any broken links along the way, Helen has the complete list of hoppers posted here.

Wednesday, March 31, 2010

April 2010 Stamp of the Month Blog Hop

It's time for the April Stamp of the Month Blog Hop.  This month there are over 60 Close To My Heart consultants participating in our hop, featuring the April Stamp of the Month Flower Pot, a set of 16 stamps.  If you arrived from Latisha's blog, you are on the right path.  If not, no worries.  Our hop is a round-robin, so you can jump in anywhere and enjoy the sights!

This will likely be my last hop for a month or two, as I am about to be stationed in Okinawa, and the movers will be coming soon to take all of my stuff (don't worry, I will keep an emergency supply of scrap stuff here at the house so I don't go into complete scrap withdrawal).  Once me and my stuff are re-acquainted in Okinawa, I will jump right back in to our monthly hops.  The participants always make such amazing and creative projects with the Stamp of the Month, I LOVE all of the inspiration!!

I made this double pocket card following a tutorial found on Splitcoast Stampers.   However, I did not mount the pocket portion on a card base, it felt quite sturdy without adding a base.  I thought the tag would make a cute bookmark, and a bookstore giftcard would be a perfect addition.  I used papers from the Felicity Collection, with some additional cardstock and ribbon.  The Felicity Collection was a promotional kit which is unfortunately no longer available, and while I was using it I was reminded that whenever there is an adorable paper kit available for a limited time, STOCK UP!!!  Keep watching, because CTMH will be offering another adorable paper kit for National Scrapbooking Month.  National Scrapbooking Month is May, but Close To My Heart will begin to offer this special kit April 15th!


The flower pot was stamped on the plaid paper in Cocoa ink, and then cut out.  The flowers were stamped on white cardstock in Black ink, colored with CTMH markers and then cut out.


Papers: CTMH Twilight and White Daisy cardstock, CTMH Felicity
Inks: CTMH Cocoa and Black, CTMH Markers in Autumn Terracotta, Barn Red, Garden Green, and Olive
Tools and Techniques: CTMH Long-Reach punch, Terrifically Tacky Tape, CTMH Sorbet stitched ribbon, paper piecing, Sticky Dots Die Cut Adhesive
Stamp Sets: CTMH Flower Pot


Remember, Flower Pot is only available April 1-30th, 2010.  Contact your Close To My Heart consultant or click here to find out how to get this stamp for a discounted price or even FREE!!

Now check out Kami's blog to see her creation. 

If  you find any broken links along the way, Helen has the complete list of hoppers on her blog.

Saturday, October 31, 2009

November Stamp of the Month Blog Hop

Welcome to the November Stamp of the Month Blog Hop! If you just arrived from Kristie's blog, you are on the right path.


This month there are over 60 Close To My Heart consultants participating. We are featuring the November Stamp of the Month, Around the Block, a set of 26 stamps. Take your time enjoying all of the wonderful artwork for display that has been created using this fun stamp set. I know I can't wait, because someone always makes something totally outside the box, and I always look forward to finding that item.

I made a gift card holder using this set. It is a 3X6 inch card, but instead of opening, the house slides up to reveal the gift card inside.


The card base was made from a 3 X 12 inch piece of cardstock, scored at 6 inches and folded like a top-fold card. The Jingle Creative Basics paper was adhered to the front.


Next, I created the houses by stamping in Versamark on chocolate cardstock and embossing with white embossing powder. I made one complete house, one roof, and one roofless house. The pieces were cut out, leaving tabs at the bottom of the complete house. After cutting out the pieces, I sponged them with Chocolate ink. The roofless house was adhered to the front of the card. I then used the top of the house as a guide to cut through the front of the card (extending a little bit beyond the edge of the house, which is necessary so the house will slide with the gift card attached). Next I adhered a piece of Juniper grosgrain ribbon (from the Jingle Creative Basics) to the back of the complete house, making a loop at the top and wrapping about 1/2 inch of the ribbon onto the front of the house at the bottom. Then the house was slid through the slit in the front of the card. After sliding the house up all the way to determine whether I needed to trim the height of the tabs, I mounted the roof piece to the sliding house using 3-D Mounting Foam. One more function check, and then I sealed the edges of the card shut with adhesive (being careful to keep the adhesive out of the path of travel for the tabs on the sliding house). Pull up the house, and mount the gift card using glue dots. You may want to check how well your house slides with the gift card attached before sealing the card base. If it is too tight. simply extend your slit a little bit more.


Fully extended, without gift card attached.


Remember, Around the Block is only available November 1st-30th. If you would like to find out how to get this stamp set at a discount or maybe even FREE, contact your Close To My Heart consultant, or check out my website.


Now hop on over to Adeline's blog to see her wonderful creation!


If you find any broken links along the way, Jena has the complete list on her blog.

Friday, December 5, 2008

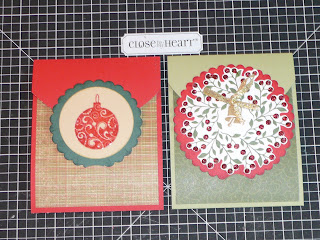
Christmas Gift Card Holders

Today I made some gift card holders for the three gift cards I will definitely be giving this year. I have been reading up on holiday tip etiquette to decide who else I "should" be giving a holiday tip to, so I may end up making some more later.

These two are flap cards., I found this style on Splitcoast Stampers. The one on the left was made using Everlasting paper, Bamboo, Cranberry and Ponderosa Pine cardstock, December Word Puzzle stamp, Marvy Uchida punches (2" circle, 2 1/2" scalloped circle) and clear embossing powder (on the ornament). The one on the right was made using Evensong papers, Cranberry and Garden Green cardstock, Festive Frills stamp set, Stickles, and some gold ribbon. Both cards are 3 1/2 X 4 1/4. The tutorial for these can be found here.


Inside...


This one I also found on Splitcoast Stampers, but there was no tutorial. I just copied and worked it out as I went. This one was made using Evensong Creative Basics papers, Cranberry and Olive cardstock, Festive Frills stamp set, Cranberry Grosgrain ribbon, Stickles and Cuttlebug Swiss Dots embossing folder. I also added a white snowflake button (I removed the part you would actually sew through) and a gold Christmas tree brad. The original can be found by searching for "gift card" on Splitcoast Stampers (my Internet Explorer crashed before I bookmarked it).


Inside...

The bad thing is, I spent a good portion of my day making these (including my fruitless search for a slot punch). I ended up going to JoAnn and Michael's before heading to two different scrap/stamp stores in Old Town Temecula. Luckily, Deborah at the Stampin' Post is way smarter than me, and suggested that I make the card slot using my 1/4" long-reach punch, a straight edge any my exacto knife. The good thing is, I think they turned out pretty cute. Now I just have to buy the cards to fill them.