Saturday, December 31, 2011

January 2012 Stamp of the Month Blog Hop

Welcome to the January 2012 CTMH Stamp of the Month Blog Hop.  If you just arrived from {Wanda's} blog, you are on the right path.  This month there are over 50 Close To My Heart consultants participating in our blog hop.  We are featuring the January 2012 Stamp of the Month Little Reminder, a set of 25 stamps.

This is definitely countdown time.  A friend is counting down to the birth of baby number three, any day now.  I received a Cricut for Christmas, so I am counting down until I receive my Art Philosophy Collection.  The Spring/Summer Idea book goes live in a month.  I'll be leaving Okinawa and headed back to my family in less than two months.  So a countdown card seemed like the perfect item to make with this versatile stamp set.

Papers: CTMH Grey Wool cardstock, CTMH You Rock
Inks: CTMH Goldrush and  Outdoor Denim

Tools and Techniques: CTMH Rhinestone Flower, CTMH Bitty Sparkles, Direct-to-paper ink distressing
Stamp Sets: CTMH Little Reminder


Remember, Little Reminder is only available January 1-31, 2012.  Contact your consultant or click here to find out how to get your own.

Now hop on over to {Mary's} blog to see what she's created.

If you find any broken links along the way, Kathleen has the complete list of hoppers listed on her blog.

Wednesday, November 30, 2011

December 2011 CTMH Stamp of the Month Blog Hop

Welcome to the December 2011 Stamp of the Month Blog Hop featuring Mad About You, a set of 14 stamps.  If you have just arrived from {Kami's} blog, you are on the right path.  If you are just starting here, you can join in our circular hop by simply clicking the link to the next blog at the end of each post.


The great thing about the December SOTM (that is, for those of you who aren't procrastinators) is that it is perfect for making your Valentine's Day cards and gifts.  I used the set to decorate a cover for a box of candy.  I started with a sheet of Blush cardstock, and then random stamped four images in Blush ink.  I then laid the cardstock face down, and used my Embossing Stylus to trace around the box, and creased the lines and made cuts where necessary.


Next I adhered the cardstock to the candy box.  I cut a strip of Pear cardstock, which was random stamped in Pear ink.  Once again, the stylus was used to mark the edges, the creases were made and the coordinating strip attached to the box.  The large heart image was stamped in Blush on Blush cardstock, and mounted using 3-D Mounting Foam.  (I apologize for the poor quality of the  photos.  I seem to have lost my camera battery charger when I moved barracks six weeks ago, so I had to resort to using my phone for pictures.)


Remember, Mad About You is only available December 1-31, 2011.  Contact your consultant or click here to find out how to get your own.

Now hop on over to {Melissa's} blog to see a project you're sure to be mad about.

If you find any broken links along the way, Helen has the complete list of hoppers listed on her blog.

Monday, October 31, 2011

November 2011 CTMH Stamp of the Month Blog Hop

Welcome to the November 2011 CTMH Stamp of the Month Blog Hop, featuring Cherish the Day, a set of 44 Stamps.  If you've just arrived here from {Nicole's} blog, you are on the right path.  If you are just starting here, just jump in and enjoy our circular hop, which has over 50 participants this month.  When you reach the end of a post, click on the link at the end to go to the next post in the hop.

My project is a birthday card for a December birthday.  I used the super-cute Roxie paper pack, which is even better in person than it appears in the Idea Book!  My card was loosely patterned after one of the cards on page 143 in the Idea Book.  And I'm LOVIN' the layers!  Six layers of scrumptious colors and patterns!  These papers are so great, and I can see them being used for all sorts of occasions (even Christmas).

The Filagree Charm was sponged with Timber Brown Staz-on ink, and the Desert Sand cardstock was sponged with Smoothie ink.  The Smoothie cardstock was cut with the Nestabilities Labels One and sponged with Smoothie ink while still in the die.  The tag was stamped in Tulip ink on Vanilla Cream cardstock and cut with a slight border.  The sentiment was then stamped on the tag in Cocoa ink.  The December tag was stamped in Tulip ink on Vanilla Cream cardstock and trimmed with a slight border.  The pieces were all mounted, and the shaped portion was mounted using 3-D Mounting Foam. 


Papers: CTMH Desert Sand, Smoothie, and Vanilla Cream cardstock, CTMH Roxie
Inks: CTMH Cocoa, Smoothie, and Tulip, Staz-on Timber Brown
Tools and Techniques: Nestabilities Labels One, CTMH Opaques Mocha, CTMH Filagree Charms, 3-D Mounting Foam, sponging
Stamp Sets: CTMH Cherish the Day, Happy Birthday, and Tender Tags


Remember, Cherish the Day is only available November 1-30, 2011.  Contact your consultant, or click here, to find out how to get yours.


Now hop on over to {Carla's} blog to see what she has created. 

If you find any broken links along the way, Kathleen has the complete list of hoppers here.

Friday, September 30, 2011

October 2011 Stamp of the Month Blog Hop

Welcome to the October 2011 Stamp of the Month Blog Hop featuring Holiday Magic, a set of 18 stamps.  If you are just arriving from {Teresa's} blog, you are on the right path.  If you are starting here, just click on the link at the end of each post to go to the next blog in the hop.

The October Stamp of the Month is always a Christmas stamp (well, at least "always" since 2007 that I can vouch for), so it is the perfect stamp to jump start your holiday crafting.  I decided to make gift tags, which I like to do every year.


Some ideas for attaching your gift tags are Embroidery Floss, Waxy Flax, and Hemp.  One thing I like to do with ribbon is punch a very small hole in the item (smaller than the width of the ribbon), and then run the ribbon through it.  The small size of the hole will hold the ribbon in place, so it isn't necessary to tie a knot.

Remember, Holiday Magic is only available October 1-31, 2011.  Contact your CTMH consultant, or click here, to find out how to get yours.

Now hop on over to {Wendy's} blog to see her magical creation.

If you find any broken links along the way, {Helen} has the complete list on her blog.

Wednesday, August 31, 2011

September 2011 Stamp of the Month Blog Hop

Welcome to our Close To My Heart consultant Stamp of the Month Blog Hop! We will be featuring the September SOTM, which is Limited Edition, a set of 21 stamps. If you have come here from {Teresa's} blog, you are on the right path!  If this is your starting point, hop on in and enjoy the fun.  Just click the link at the end of the post to take you to the next blog in our hop.

This is one of many CTMH stamp sets that coordinates with the new Cricut© Art Philosophy Collection, which is exclusive to Close To My Heart and includes the Art Philosophy cartridge, 3 My Acrylix® D-sized stamp sets, and 3 9" X 12" Dimensional Elements (Item number for the collection is Z1686).  I look at this stamp set and had inspiration for book marks, gift tags, and the project that I made, magnets.


I stamped the images on cardstock, and used some of our (now retired) Window Charms.  I simply applied the Window Charms over the stamp image, cut out with my cutting knife and glued a magnet on the back (you can use magnetic sheets, which are usually self adhesive, as well).   Since my barracks room has a metal door, I now have a cute magnet to hang my "don't forget" list (so maybe I'll stop forgetting my coffee, or workout clothes, or mp3 player...) when I leave for work or school.  The other two will go to work for my board; the clock is for anything time-sensitive, and the hand is for my "to do" items.  I love when I get to have something cute and useful at work!

Remember, Limited Edition is only available September 1-30, 2011.  Contact your consultant, or click here, to find out how to get yours.

Now hop on over to {Angel's} blog to see her enchanting creation. 

If you find any broken links along the way, Helen has the complete list of hoppers here

Sunday, August 14, 2011

August 2011 CTMH Spotlight Blog Hop Featuring Circle Cards

Welcome to the CTMH Spotlight Blog Hop featuring Circle Cards.  If you've arrived from{Luisa's} blog, you are on the right path.  If you are just starting here, welcome to our circle hop.  Simply click on the link at the end of the post, and it will take you to the next blog in the hop.  Once you get back here, you've completed the hop!

Circle cards can be unique and lots of fun, but they can also be a hassle.  Trying to cut your circle just right, trying to find an envelope to fit it...ugh!  But, Close To My Heart has made it easier to make it from your heart with Circle Cards.  They are available in Colonial White (Z1352) or White Daisy (Z1353), and they come with matching envelopes.

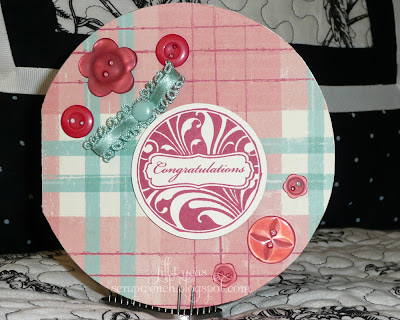
I made this card using they Key To My Heart paper pack (a special from a few years back).  I matched the paper up to the card, and using the card as my template cut out a piece for the front and a piece for the inside.  After gluing on the paper and letting it dry, I added some Sorbet buttons, Juniper ribbon with Juniper Bigger Brad, and used 3-D Mounting Foam to mount the sentiment, which is from Salutation Seals and was stamped in Sorbet ink on Colonial White cardstock, and I used a Marvy Uchida punch for the circle.  The buttons were adhered with Liquid Glass, and my Circle Card is cute, coordinated, and quick!  


Circle Cards are a cute and fast way to make cards and their size makes them convenient to help you use up your scraps.

Now, hop on around to {Adeline's} blog to find more inspiration!

Sunday, July 31, 2011

August 2011 Stamp of the Month Blog Hop

Welcome to our Close To My Heart consultant Stamp of the Month Blog Hop! We will be featuring the August SOTM, which is Wicked, a set of 9 stamps. If you have come here from {Georgia's} blog, you are on the right path! If this is your first stop, you can hop right in and enjoy our round-robin hop.

I went a bit outside the box and used this set to make a birthday card for a friend.  I stamped the witch image, and then cut it out (cutting the bird away entirely).   I had the Eagles' Witchy Woman going through my head while making this card.  LOL.  I was pretty excited because I used a paper pack (Olivia) and two colors (Pear and Smoothie) that I had never used before (I haven't been scrapping much this year, owing to my work, school, and volunteer schedule).  The Today's Date image was stamped on Bamboo cardstock, and cut out using a Coluzzle circle.  I circled the "1" with Barn Red marker (my friend's birthday is the 1st), and the "Happy Birthday" sentiment was stamped in Chocolate ink.  I had pulled out all sorts of embellishments to use, but as I started assembling the card, embellishments just seemed like too much for this card.  I guess that's an advantage to using such busy (and I don't mean that in a bad way!) paper. 


Papers: CTMH Bamboo and Smoothie cardstock, CTMH Olivia
Inks: CTMH Barn Red, Chocolate,  and Olive, CTMH Barn Red Market
Tools and Techniques: Fiskars Threading Water punch, Coluzzle Circle,
Stamp Sets: CTMH Wicked, Card Chatter-Birthday, and Today's Date


Remember, Wicked is only available August 1-31, 2011.  Contact your consultant, or click here, to find out how to get yours.

Now hop on over to {Sheila's} blog to see her enchanting creation. 

If you find any broken links along the way, Kathleen has the complete list of hoppers here.

Thursday, June 30, 2011

July 2011 Stamp of the Month Blog Hop

Welcome to the July 2011 Stamp of the Month Blog Hop featuring American Celebration, a set of 12 stamps.  If you have just arrived from {Terrie's} blog, you are on the right path.  If you are just starting here, you can join in our circular hop by simply clicking the link to the next blog at the end of each post.

My project is a set of place cards for your Independence Day picnic table.  Simply cut cardstock to your desired width by two times your desired height, then score and fold.  Stamp the images in shades of red and blue (I used Cranberry, Pacifica, and Sky), and stamp or write in the guests' names.  I also made slightly larger cards that you can use to label the tables (really useful if you are having a potluck, so like dishes are put together).  I used the rock and roll technique on the "dessert" card, first inking the stamp in Sky, then rolling the Cranberry stamp pad around the edges to get the two colors blended.  Names were stamped using Friendship Alphabet Small.


Remember, American Celebration is only available July 1-31, 2011.  Contact your consultant or click here to find out how to get your own.

Now hop on over to {Nicole's} blog to celebrate her project.

If you find any broken links along the way, Helen has the complete list of hoppers listed on her blog. 

Tuesday, May 31, 2011

June 2011 CTMH Stamp of the Month Blog Hop

Time for the June Stamp of the Month Blog Hop.  If you just arrived from {Lisa's} blog, you are on the right path.  This month there are over 50 Close To My Heart consultants participating in our round-robin blog hop.  We are featuring the June 2011 Stamp of the Month Jubilation, a set of 24 stamps.

It is PCS season (that means "Permanent Change of Station", or moving season for all of you non-military types), so that means several of my friends will be moving in the next few weeks.  I used the stamp of the month to make a few "good luck" cards.  These cards were made using the pattern for card 1 of the greetings card workshop in the book Wishes by Jeanette Lynton.  Two sheets of cardstock and one sheet of B&T paper give you all the pieces you need to make 16 cards.   This stamp set is perfect with the greetings card workshop, because you can make a bunch of cards for a variety of occasions faster, simpler, and easier.  Three pieces of paper and one stamp set!  I LOVE easy!


Papers: CTMH Sweet Leaf and Juniper cardstock, CTMH Creative Basics Wings
Inks: CTMH
Cocoa, Juniper, and Sweet Leaf
Tools and Techniques: Wishes, Direct-to-paper ink distressing, sponging, 3-D Mounting Foam
Stamp Set: Piece of Cake


Remember, Jubilation is only available June 1-30, 2011.  Contact your Close To My Heart consultant, or click here, to order one for yourself.

Now hop on over to {Georgia's} blog to experience her Jubilation!

If you find any broken links along the way, Helen has the complete list of hoppers here.

Saturday, May 14, 2011

CTMH Spotlight Blog Hop Featuring Buttons

Welcome to the May 2011 CTMH Spotlight Blog Hop featuring buttons.  If you've just arrive from {Luisa's} blog, you're on the right path.  If you are just starting here, you can still enjoy the whole hop.  Our hop is a circular hop, so just click on the link at the end of each post to take you to the next stop on the hop.
 

One thing I love about CTMH is that the accessories and embellishments match the inks and papers perfectly.  However, sometimes you want to do something a little different.  I wanted to incorporate a patterned button into my card, so I made my very own designer buttons using a patterned paper, Liquid Glass, and a few clear buttons.


 To do this, simply cover the back of your button with Liquid Glass, then place it on the paper.  Press it down to ensure no air bubbles, and every few minutes press down again to ensure it stays even (notice the one on the paper is raised up on one side, you don't want your final product like that).  Once it is dry, cut around the button, sand the edges if necessary, use your Piercing Tool or Embossing Stylus to poke through the holes, and then attach to your project.


I made my card following Mojo Monday Sketch 190, and the H2H Challenge (All Buttoned Up).   

 Now hop on over to {Nikka's} blog to see what she's put together!  If you find any broken links along the way, Wendy has the complete list of hoppers here.

Saturday, April 30, 2011

May 2011 Stamp of the Month Blog Hop

Welcome to the May 2011 CTMH Stamp of the Month Blog Hop, featuring Chairs to You, a set of 14 Stamps.  This month we have over 50 Close To My Heart consultants participating in our hop.  If you've just arrived here from {Sheila's} blog, you are on the right track.  If you are just starting here, our round-robin hop can still be enjoyed in it's entirety.  Just follow the links at the end of each post, and eventually you'll end up right back here!

I made this card following the sketch for Mojo Monday 188 and the OCC Challenge (easel cards).  Rather than make a round or square card, I opted to use my Nestabilities Labels One die to make my card.  This card actually had quite a monochromatic feel until I colored the flowers of the chair Vineyard Berry.   After that addition, I figured a bit more color would look good, so I used a Cocoa button and Antiqued Copper brads as the centers of the flowers, which were colored using homemade glimmer-y mist.  The scalloped circle was sponged with ink in the same color (Juniper), and mounted with 3-D Mounting Foam.  Decorate the inside, and a cute housewarming card for a friend who is about to move (of course, knowing my "postal failure" history, only time will tell if this card actually makes it to the intended recipient).


Papers: CTMH cardstock in Cocoa, Juniper, and Sweet Leaf, CTMH Wings Creative Basics
Inks: CTMH Cocoa, CTMH Markers in New England Ivy and Vineyard Berry

Tools and Techniques: Nestabilities Labels One, Cuttlebug, CTMH flowers, CTMH ribbon (included in Wings Creative Basics, CTMH Buttons, CTMH brads, Marvy Uchida punch, 3-D Mounting Foam
Stamp Sets: CTMH Chairs to You


Remember, Chairs to You is only available during the month of May 2011.  Ask your consultant, or click here, to find out how to get this stamp for a discount or possibly even FREE!


Now hop on over to {Brae's} blog to see what she's created.


If you find any broken links along the way, Helen has the complete list of hoppers here.

Monday, March 14, 2011

March 2011 CTMH Spotlight Blog Hop

Welcome to the March 2011 CTMH Spotlight Blog Hop.  This month we are featuring scrapbooking techniques.  If you just arrived from {Haley's} blog, you are on the right path.  If you're just starting here, you can enjoy our hop by simply clicking the link to the next blog at the end of the post.

I decided to feature Studio J layouts, specifically using them in interactive layouts.  I have printed several Studio J layouts that I intended to add something to after I received it.  In some instances, it was a picture that I didn't have electronically (a copyrighted photo from an event, for instance).  Other items have been pressed pennies, tickets, and in today's example, bib numbers from races.


There are a lot of great ways to add interactive elements to your scrapbook layouts.  One of the easiest is to use Memory Protector Flip Flaps.  But the technique I am going to show you today is ideal when the interactive item is an unusual size.  My bib number was 8 1/4" X 8 3/8", so instead of a flip flap, I used a piece of transparency film (yes, those same sheets that you remember from elementary school, which you can buy in your local office supply store).  I cut a piece of transparency film 5" X 8", and scored it down the length.  Next, I used a bone folder to sharpen the crease (hint:  if you don't have a bone folder, the My Acrylix® blocks can be used to serve the same purpose).  You really want to create a sharp crease so your interactive portion will lay flat when closed.  Next, I attached the transparency to the back of the layout using Terrifically Tacky Tape.  When you are using the transparencies, you need to use a really heavy-duty adhesive, because the slick material doesn't hold adhesive well.  Also, you'll want to make sure to NOT put the layout or the materials you are attaching all the way up into the crease.  If you don't leave a bit of space at the crease (really, you don't need much), your interactive flap won't lay down flat when you are finished (see the layout below, from the first time I did this technique.  All except the bottom right photo were mounted using this technique-except through the page protector.  Notice how the top left photo on the right page isn't laying flat.  That's because I put the pieces all the way up into the crease, so it didn't have room to close flat).  


After attaching the flap to the back of the layout, I prepared my two pieces for the outside of the page protector.  One is the race number, the second is a piece of cardstock that I cut to match the size of the race number and used for journaling.  Be mindful of how the viewer will look at the items when you mount them.  Because I was using two items, I sandwiched the outer piece of transparency between them, once again using Terrifically Tacky Tape.  I adhered the cardstock and race number to each other using my regular adhesive (only part of each is attached to the transparency).  Then I simply lifted my "flap" and slid the page into the page protector, then laid the flap down on the outside of the page protector.  The race number is made of Tyvek, so I wasn't really concerned about it not being protected.  If you are using something that is paper, laminate it before attaching to the transparency (that is exactly what I did the first time I used this technique, and is how I discovered Terrifically Tacky Tape, as none of the other adhesives I tried would keep the laminated item attached to the transparency.


I hope I've given you some ideas for your scrapbook pages, and helped you to see how you can incorporate items into your layouts to make them interactive.  Now hop on over to  {Adeline's} blog to see what she's created.

If you find any broken links along the way, Wendy has the complete list of participants on her blog.

Monday, February 28, 2011

March 2011 Stamp of the Month Blog Hop

Welcome to the October 2010 CTMH Stamp of the Month Blog Hop, featuring Sensational Season, a set of 10 Stamps.  If you've just bounced here from {Brae's} blog, you are on the right track.  If you are just starting here, just jump in and enjoy our circular hop, which has over 60 participants this month.  When you reach the end of a post, click on the link at the end to hop to the next post.

I couldn't resist all of the hoppy references with the cute little rabbits in this stamp set!  I also decided to bend the rules a bit and made a birthday card instead of an Easter card.  I made this card following Mojo Monday sketch 179.  The adorable little hare was colored using Copics, and I paper-pieced his jacket.  Since I'd stamped him on White Daisy paper to color him, and WD was too bright to look good with the other colors, I sponged around him to make it blend better.  I used Nestabilities Classic Oval Large for the oval.  Martha Stewart punch was used for the lacy border, which was then DTP distressed with Twilight ink.  3D Mounting Foam was used to mount the square, Xyron Create-a-Sticker was used for the ribbon, and glue dots were used for the buttons.  The paper pack is Felicity, which was a promotional paper pack last year.


And hare's a close-up of the bunny (before sponging).


Now hop on over to {Tammy Lea's} blog to see her sensational work.  Remember, Sensational Season is only available March 1-31, 2011.  Contact your CTMH consultant, or click here, to find out how to get yours for a discount or even for FREE!

If you find any broken links along the way, Helen has the complete list of participants {here}.

Monday, February 14, 2011

CTMH Spotlight Blog Hop Featuring Color Combos

Welcome to the February 2011 CTMH Spotlight Blog Hop featuring color combos.  If you've just arrive from {Adeline's} blog, you're on the right path.  If you are just starting here, you are in for a treat.  Our hop is a circular hop, so just click on the link at the end of each post to take you to the next stop on the hop.

The CTMH Idea Books are much more than just a catalog.  They are full of great layouts, cards, and projects that you can look back on for inspiration.  I have all of my Idea Books going back to the first CTMH gathering I attended in 2006.  One of the great inspirations to be found in our Idea Books are the color combos.  I always love getting to the My Acrylix stamp section to see the artwork created using interesting color combos.  The color combo I'm using comes from the Autumn/Winter 2007 IB and features three colors that debuted in my first IB (A/W 2006).  The colors are Cocoa, Honey, Petal, and Twilight.  And since (with the exception of Cocoa) I'm pretty sure none of those colors has been with another in any CTMH paper pack, that left me to my cardstock and embellishments.  But never fear!!!  CTMH colors are easy to match with our Exclusive Inks and Re-Inkers.


This is just a "Fat Lil' Notebook" that I'm embellishing so there is no confusion as to whom it belongs.  First I took out the spiral, and then covered the front and back cover with cardstock.  One thing I love doing with my cardstock is ink distressing with the matching ink.  That gives the oomph of the technique without making it too busy.

But then I realized that there is no ribbon in Twilight, Honey, or Petal.  Never fear, there are several ways to get a perfectly-matched ribbon.  For the Twilight organza ribbon, I cut a length of White Daisy organza and put it in a sandwich bag (the zipper type), making sure to push it toward the bottom.  With the bag lying on its side, I dripped about 15 drops of Twilight Re-Inker into the bag near the top.  Then I carefully closed and zipped the bag, and smooshed the Re-Inker across the width of the bag.  After it seemed to be fairly evenly distributed, I pushed the ribbon up into the ink and rubbed the bag around.  Once it appeared to have good coverage, I unzipped the bag and pulled the ribbon out to dry.  There were a few spots with too much ink, so I patted the ribbon with a paper towel.  And since I did this inside a zipped baggie, no inky smudges on my fingers (I removed the ribbon from the baggie using tweezers to keep my fingers clean)!

The Honey ricrac was colored in a different way, since I don't own Honey Re-Inker.  I simply opened up my Honey ink pad and set it on a plastic grocery bag.  Next, I took my length of ribbon, and starting at one end laid it on the surface of the ink pad. Then I used an edge of the plastic bag around my fingers while I pressed the ribbon into the ink pad, making sure to get both sides of the ribbon.  After the first pass, there was a pretty cool pattern showing white through the Honey, but I decided to go for a solid color.  So, second pass entailed pressing the ribbon into the surface of the ink pad while pulling it through for full coverage.  A few spots looked a bit more color-saturated than the rest, so I blotted them with a paper towel.  Voila!  MORE perfectly-matched ribbon!!!

So, I challenge you to find some color inspiration, and don't let your options be limited by how things are.  Use inks, Re-Inkers, and markers to get things just the color you want!

Now hop on over to {Wendy's} blog for some more color inspiration!

Monday, January 31, 2011

February 2011 Stamp of the Month Blog Hop

Welcome to the February 2011 CTMH Stamp of the Month Blog Hop, featuring Friendship, a set of 8 Stamps.  If you've just arrived here from {Kristie's} blog, you are on the right path.   But, if you're just starting here you won't miss a thing.  Our hop is one big circle, so jump right on in and enjoy the artwork!

Well, one of the joys of living in Okinawa is the mail.  Sometimes it arrives, and sometimes it doesn't.  Sometimes part of your shipment arrives, and sometimes you have to have things tracked and re-shipped...unfortunately my new Stamps of the Month haven't arrived, so I don't have any new artwork to show just yet.  But I'm keeping my fingers crossed that they'll show up tomorrow (which would be today now that you're reading this. LOL).  Keep yours crossed too please!  I'm quite bummed out, because as you may have noticed from my blog background and the background in some of my pictures, I really like damask and black and white.  I hope you'll have as much fun with this stamp as I hope to.  In the meantime, here is a picture of the images in this set.


Remember, Friendship is only available February 1-28, 2011.  Contact your consultant, or click here, to find out how to get yours for a discount or even for free. 

Now hop on over to {Traci's} blog to see what she's created.

Wednesday, January 19, 2011

A New Bookmark

My ninja progressed to his most recent belt a few months back.  While I was home at Christmas, he mentioned that he needed a new bookmark (as he was still using his blue belt bookmark).

I definitely need to practice my hair coloring techniques.  I just gave up and went with what I ended up with, rather than start over.  He's a boy, he won't care.  LOL.  You can view the last one I made for him (with much better hair) here

Ian's skin was colored with E00 and E02, his pants with 110, hair was E33, Y21, Y06, and Y00 (and who knows what else, I was trying to salvage it after all!!), belt was CTMH Watercolor Pencil and shadowing was Prismacolor Premier Cool Grey 10%.


Papers: CTMH cardstock in Hydrangea and White Daisy
Inks: Brilliance Graphite Black, Copic Markers
Tools and Techniques: CTMH Watercolor Pencils, Basic Grey Small Magnetic Disks, Xyron Lamination, Cuttlebug, Nestabilities Large Labels, CTMH Liquid Glass
Stamp Sets: CTMH Tiny Typewriter, TGF Karate Ian (digital)


The magnets are self-adhesive, but I used some Liquid Glass to ensure a good long-term bond.  The lamination will also serve to keep the magnet disks in place.  The lamination wasn't applied until after I took the picture, as it tends to cause a glare and make it a challenge to get a decent shot.

Tuesday, January 18, 2011

More Studio J

Here's another Studio J layout of our vacation in 2009.  I never bought the Stickease to go with this paper pack, so I love the fact that Studio J includes the matching Stickease for each paper pack!


Friday, January 14, 2011

January 2011 CTMH Spotlight Blog Hop

Welcome to the January 2011 CTMH Spotlight Blog Hop!  This month our hop is featuring Valentine's ideas.  If you have just arrived from {Debbie's} blog, you are on the right path.  If you are just beginning here, you won't miss any of the action, as our hop is a full circle.  Just click on the link at the end of each post to take you to the next blog in the hop.

My project is a Valentine's box.  This box actually has multiple uses.  It could be placed on the desk to receive Valentines in, it could be given full of chocolate kisses, or it could even be used to hide a jewelry box.  The box came from the dollar bin at Target, and all other items are CTMH (unless noted).


Papers: CTMH cardstock in Blush and Garden Green, CTMH That's Amore
Inks: CTMH Chocolate and Tulip, StazOn Timber Brown (to color the Colonial White Bigger Brads), CTMH Re-inker in Blush and Tulip
Tools and Techniques: CTMH ribbon(Cocoa Collection), CTMH Bigger Brads (Colonial White), Sponging (to color the Colonial White Bigger Brad and the cardstock on the flag), White Daisy Crochet Flowers (from Mini Medley Accents Collection), Mod Podge
Stamp Sets: CTMH Amore

Two outside of the ordinary things I did for this project:  I used alcohol mixed with Re-inker to color the crochet flowers, and I coated the completed box with Mod Podge to give it extra durability.

I hope you're inspired to create a fun Valentine project of your own.  Now hop on over to {Vicki's} blog to see her creation.

Saturday, January 1, 2011

Happy New Year!!!

I will scrap more in 2011!!!  To get that off to a good start, I made a few Studio J layouts on New Year's Eve.  This is from our family vacation in 2009.


I love Studio J membership!  I get free shipping on one order of layouts each month (minimum and maximums apply, and vary based on shipping location), my layouts are half-price because I'm a member, there are special papers and layouts that are only available to members, I get free page protectors with every order, and I get free .jpgs of my purchased layouts (both high resolution for printing, and lower resolution for posting online).  Want more info on Studio J?  Just check it out on my website by clicking here.